

Sending emails from Quickbooks 2015 with Office ProPlus
As an MSP, we have a large volume of disparate clients. One thing that a large majority of our clients do have in common is that they’re using Office 365 for their email, CRM, SharePoint, Office licensing, etc… One issue in using Office 365, and Office 2013/2016 “ProPlus” licensing specifically, is that the Office downloaded from the Portal is much different that the retail or VL version of Office. In this ProPlus version, otherwise known as the dreaded click-to-run, updates are not managed through Windows updates (don’t get me started on that), it’s literally impossible to deselect a specific program for install, and worst of all it’s simply not supported for use by some software. The retail and VL versions are just fine, update thorough Windows, can interface with just about any program, etc…. but this click-to-run has specific limitations.
After a desktop at one of our clients was upgraded to Office 2013 ProPlus the option to send QuickBooks emails via Outlook had disappeared! This option was available for other users in the office with the same setup, Office 2013 and QuickBooks 2015 Enterprise edition, but for some reason this option had disappeared for this specific user after install.
In asking Google for help with this issue, you’ll more than likely be redirected to this page (link) that states that Click to Run and ProPlus versions of Office 2013/2016 are simply not supported! Oh no! But, there is a fix that can be applied with a bit of manual work if you’re willing to do so.
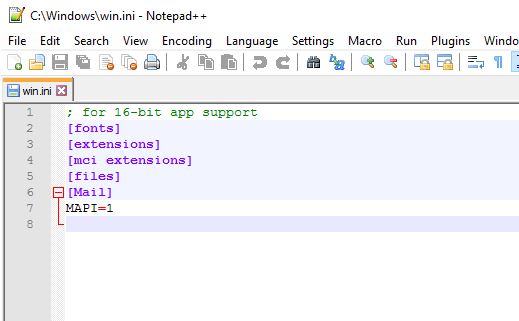
Step 1: First, you’ll want to take a page from the linked QB article above and edit the win.ini file. This file is located in C:\Widnows and is, of course, named “win.ini”. Every Windows computer should have this file. Open this file in a text editor (I always suggest notepad++, even if the developer is a bit “interesting”) and take a look at what you have. Here is what was in mine when it was first opened:
If your win.ini does not have the [Mail] tag, add it. If it does, great! Once the [Mail] tag is present we’ll also need to add these two fields below: MAPI=1, and MAPIX=1. This is what your win.ini should look like when it is done:
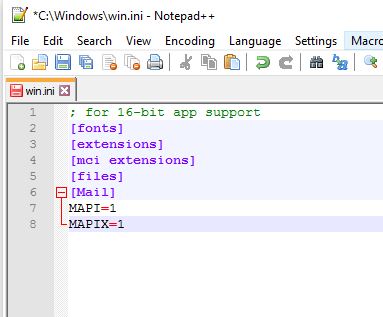
You can copy and paste the below:
[MAIL]

MAPI=1

MAPIX=1
Step 2: Second, we’ll need to add some registry keys under the current user’s context. DO NOT run regedit as administrator, it will not add the keys to the proper user context. If one of the keys or REG_SZ values does not exist (The “HKEY_LOCAL_MACHINE\SOFTWARE\Microsoft\Windows NT\CurrentVersion\MAIL” key did not exist on any of the computers I’ve done this on) create the proper keys or string values in the proper area. Here are the keys and string values you need to have:
[HKEY_LOCAL_MACHINE\SOFTWARE\Microsoft\Windows NT\CurrentVersion\MAIL]
"MAPI"="1"
“MAPIX”=”1”
[HKEY_LOCAL_MACHINE\SOFTWARE\Microsoft\Windows Messaging Subsystem]
“MAPI”=”1”
“MAPIX”=”1”
[HKEY_LOCAL_MACHINE\SOFTWARE\Wow6432Node\Microsoft\Windows NT\CurrentVersion\MAIL]
“MAPI”=”1”
“MAPIX”=”1”
[HKEY_LOCAL_MACHINE\SOFTWARE\Wow6432Node\Microsoft\Windows Messaging Subsystem]
“MAPI”=”1”
“MAPIX”=”1”
Step 3: Once all the above was complete we opened QuickBooks, logged into the company file needed, went to Edit -> Preferences -> Send Forms and voilà, there was the option to use Outlook!
Comments are closed.